I have seen this many times but never in time to participate! So since I am still enjoying the holiday I decided to jump in. I know I’m a day late I don’t care. I did a video to go with her and here she is. I added some details after the camera stopped. I think this challenge will help me with my goal of learning to draw in 2014.
Tuesday, September 02, 2014
29 Faces Day 1
I have seen this many times but never in time to participate! So since I am still enjoying the holiday I decided to jump in. I know I’m a day late I don’t care. I did a video to go with her and here she is. I added some details after the camera stopped. I think this challenge will help me with my goal of learning to draw in 2014.
Wednesday, July 23, 2014
Nib Nest
Last night at the Kentuckiana Calligraphy and Paper Art Guild meeting we learned how to make a nib nest. Details are in the Nest Nib video on my YouTube channel, including a link to the blog with the instructions. But I wanted to post some additional photos here. Click each one and it will enlarge.
To me it is so fun to get together with other crafters and create!
In the hands of the creator,
QP
Friday, July 18, 2014
My Last name
My maiden name used to be brown but my dad and I have quite the green thumbs despite it. Dad more so than I. Now everyone pronounces my married last name as Living, incorrectly I might add. Sort of catches in my craw when I try so hard to say it right like Levy. Never mind that. I took some lovely pictures of my garden and wanted them on the record here. So next year I can compare and maybe repeat the planter below because I love it so.
I’m enjoying some of those tomatoes already and froze a couple of green peppers! Love these raised bin/beds. Hope next year to have a fenced portion of the yard to really work in.
Just have not taken the time to put in the ground work. Like calling BUD (before you dig) and finding out where I can and cant put in my garden. I want it near the deck so I can see it and enjoy it.pm
This is my carpet rose…just like the one my dad planted for me back home.
So far a great gardening year. I hope you are enjoying your spring in July like we are. The weather is just great to me!
In the Hands of the Master Gardener!
QP
Saturday, July 12, 2014
The Accidental Dragonfly
As promised I am back to share what I made with Tim Holtz’ Layered Dragonfly die and embossing folder set. Remember from yesterday I was in need of cards. Way behind am I in sending out birthday cards.
A while ago I made some spray inks with distress re-inkers and just test sprayed them on a sheet of paper. This caught my eye so I used it as my background designer paper. My own paper!!! how cool is that.
The verse is me trying to embrace my own handwriting (that “d” in penmanship still haunts me). The stripe of numbers is also an accident it was left over from a journal page..I slapped that on too. And my final layer is the dragonfly cut from the packaging it came in. It was a bit to clear for my taste and that lead to the last happy accident a whole journal page.
I want to add some Prima Color Bloom spray in Storm Cloud to the plastic dragonfly die cut. And being the 10/dollar girl that I am; I did not want to waste the overspray. I laid it onto a gessoed page in my journal and sprayed away! And this is what happened The sprayed looked heart shaped so I enhanced it with a charcoal pencil and blending stump.
BONUS journal page for today done! Oh by the way I love the Prima Color Bloom sprays!
Oh and by the by I killed my old YouTube channel and have a new one elonqp; I’d love if you subscribed. Thanks!
IN HIS HANDS,
QP
Friday, July 11, 2014
New Stuff!
This year’s word is DO. So in keeping with that mantra I am trying to use the things I buy.
The Tim Holtz layered dies arrived in the mail this week. I was able to sneak the box by my husband and into the hoard room aka my studio. What is so special about these dies is that they are steel rule and therefore will cut thick materials with ease (Mostly). AND they come with embossing folders that match!
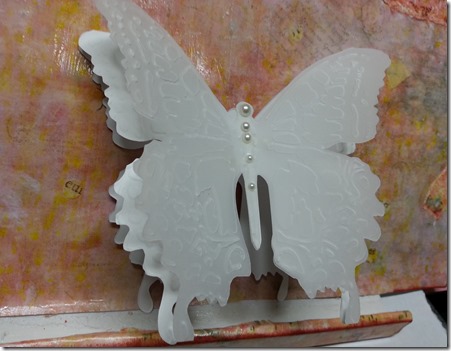
SO as I needed several cards and I got them out to play. The first one I used to make a shaped card and it was so fun I made 2.
One white on white:
I layered vellum on top of white cardstock and topped it with pearls. I tucked some pearls behind the vellum layer so it will stay popped up.
And one in color:
I inked the card with pinks and oranges from Paper Trey Ink and for the darks I used
Vintage Photo.
Tomorrow I’ll show you what I did with the dragonfly!
I leave you in the Hands of the Creator!
QP
Friday, February 14, 2014
Scraps of Color Hearts and Roses Blog Hop
Happy Valentine's Day and welcome to the Scraps of Color Hearts and Roses Blog Hop! I, along with some talented crafters, have teamed up to share Valentines and love-themed projects! of course, Valentine's Day is all about sharing the love, and this hop is no exception! There may be giveaways on various blogs throughout the hop! If you came from Cassie: http://www.cassiescraftcafe.blogspot.com/
you are in the right spot.
I want to show you two cards I made with my Zing. I found the beautiful heart flourish on the Silhouette store. And I combined it with a heart cut file to make what you see below. The scalloped border was not used.
And here are the finished cards:
I made a video of the card construction and if you like my videos please give me a thumbs up.
Please continue on to the next blogger for some valentine inspiration.
Blog Hop Order:
Cassie: http://www.cassiescraftcafe.blogspot.com/
You are Here QP: http://qpqueenpam.blogspot.com/
Next Up Shalana: http://scrappinwithshalana.blogspot.com/
FranCine: http://confiseriespapier.blogspot.com/
MJ: http://afrocentriccreations.blogspot.com/
Princess:
http://www.papercraftingparadise.blogspot.com/
Tiare: http://www.iclassygirl.com/
Treva: http://www.scrappint.blogspot.com/
An'Jenic: http://anjenicgibson.blogspot.com/
Renee: http://domestikdivadesigns.blogspot.com/
Susan: http://craftysue52.blogspot.com/
Cheryl: http://www.onecraftyncpeach.blogspot.com/
Debra: http://www.cdebbiscrap.blogspot.com/
In His Hands
Sunday, January 26, 2014
I’m Glad I Listened
An artist friend whose work I enjoy told me when I started to learn to draw to scan in my work and keep it so that I could use it over and over. I have been doing this and here is a piece I used over, you’ll remember it from my last post. Didn’t take me long huh.
I started this on a piece of Masonite that I got at the hardware store. I had them cut it into 2 foot by 2 foot squares and then I cut it down to this 6in x 6in square. My cuts are rough but I think this adds to the feel of the piece. Yep that’s my story and I’m sticking to it. If anyone knows how to cut this stuff easily please let me know. I own a dremel and a jigsaw.
I glued on a piece of deli paper and then gessoed it. Painted the background a nice magenta. Then I layered some Basic Grey paper and gave that a wash with the magenta thinned down. Tore around a laser print of my artwork (ooo artwork) and glued that down. Used some yellow to blend her into the background of the piece.
I stamped the saying onto another piece of deli paper and glued it on. The wings were a butterfly that was laying on my desk. The pearls are from a Viva Décor pearl pen. I have the whole piece standing via a Tim Holtz easel. I’ll be sending this on to someone who I think could use it.
Be blessed!
In His Hands,
QP